Instructors can use Moodle Groups to divide a class into sections or create collaborative working groups for particular course Activities. For example, an instructor might create a group for each cohort in a course with graduate and undergraduate students to show them different assignments and readings or create project groups to make it easier for students to collaborate on joint work.
Before you start, you may need the following:
- an Instructor of record or Other editing teacher role in a Bryn Mawr Moodle course.
Create groups
Manually
Use this option if you want maximum control over the name of each group and do not need to randomly assign students to groups. See also this Moodle video demo.
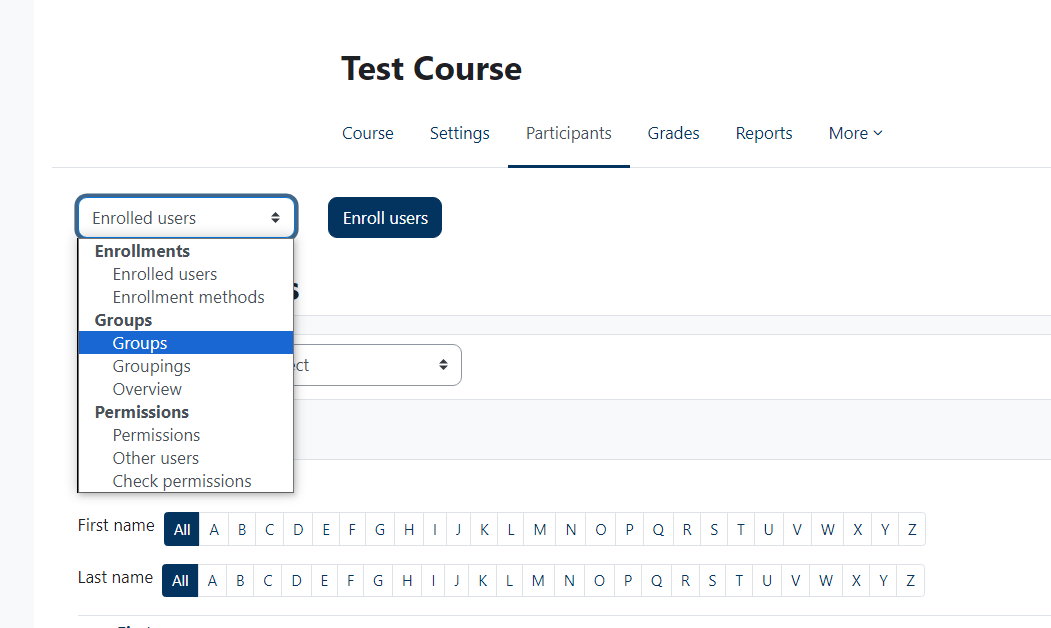
- Open your Moodle course.
- Click Participants.
- Select Groups from the drop-down menu.

- Click Create Group.
- Enter a Group name, and optionally a Description and picture. (Group name cannot be edited once you've added members.)
- If self-enrollment is enabled for the course (uncommon), enter an Enrollment key to enable students to ALSO self-enroll for the group using that key.
- Select a Group membership visibility level:
- Visible. All students can see the group and who its members are.
- Only visible to members. Only students in the group see it and who are members are.
- Only see own membership. Only students in the group can see it, and they can't see who the other members of the group are.
- Hidden. Students can't see the group (even if they are members).
Note: Groups and group membership are always visible to Instructors of record, Other editing teachers and Non-editing teachers.
- If you chose Visible or Only visible to members, you have two additional options:
- Check Show group in dropdown menu for activities in group mode to enable group members to select a group when viewing an activity with Visible groups. (See Group settings for Activities, below.)
- Change Group messaging to Yes to enable group members to message each other using Moodle's built-in IM platform (see Moodle: Message course participants)
- Click Save Changes.
Automatically
Have Moodle create a specified number of groups and/or auto-assign students to groups for you. (You can also manually add and remove members from auto-created groups.)
- Open the Moodle course.
- Click Participants.
- Select Groups from the drop-down menu.
- Click Auto-create groups.
- Create a Naming scheme by typing in a name, plus
# to number the groups or @ to letter them. For example, typing Group # creates groups named Group 1, Group 2, Group 3, etc.
- Set Auto create based on to:
- Number of groups and enter that number in the Group/member count field - OR -
- Number of members and enter the number of members per group in the Group/member count field.
- Click Select members with role and choose the role you want to auto-allocate (for example, Registered student). You can manually add people with a different role to groups after they are created if needed.
- Select an Allocate members option:
- No allocation. Moodle creates the groups, but does not assign students to them.
- Randomly (default). Moodle randomly assigns students to groups.
- Alphabetically(first name, last name),Alphabetically (last name, first name) or ID number. Moodle sorts Participants with the selected role according to the method chosen, then groups them.
- If you chose Number of members as the auto-create basis, check Prevent last small group to add one member to a few groups so that no group is too small.
- Check Ignore users in groups to exclude participants who are already members of other groups.
- Click Submit.
Add/remove Group members
If you just created groups, skip to step 4.
- Open your Moodle course.
- Click Participants.
- Change the drop-down menu to Groups.
- Select a group, then click Add/Remove Users.

- To add members:
- Highlight a name in the Potential members field. (Press Ctrl (Windows) or Command (Mac) while clicking to select multiple people.)
- Click Add to move the highlighted people to the Group members field.
- To remove members:
- Highlight a name in the Group members box. (Press Ctrl (Windows) or Command (Mac) while clicking to select multiple people.)
- Click Remove to move them to the Potential members field.
- Click Back to Groups.
Restrict access to course materials by group
If you need to provide different course materials for some students in a course, such as graduate students in a course that also enrolls undergraduates or students taking a course for language credit who need readings in that language, create a group for those students, then create course resources or sections visible only to that group.
For course section
Make all contents of a course section visible to certain groups and not others.
- Open the Moodle course.
- Toggle the Edit mode switch to on.
- Click (Edit), and select Edit section.
-
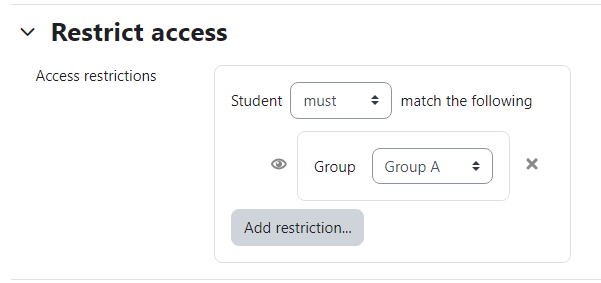
Click Restrict access to expand it, then click Add restriction.
- Click Group, then select the group using the drop-down menu.
- To add additional Groups:
- Click Add restriction, then Group again.
- In the first sentence, change "Student must match ALL" to Student must match ANY".
- Select a second Group.
- Repeat until all Groups who should have access are listed.
- Click Save and Display.
For individual resources (files, URLs, etc.)
Make individual files, URLs and and other resources visible to certain groups and not others.
- Click on the resource.
- Click Settings
- Click Restrict access to expand it, then click Add restriction.
- Click Group, then select a group using the drop-down menu.

-
To add additional Groups:
- Click Add restriction, then Group again.
- In the first sentence, change "Student must match ALL" to Student must match ANY".
- Select a second Group.
- Repeat until all Groups who should have access are listed.
- Click Save and return to course.
Create collaborative group workspaces
Create online spaces for students to work in groups by applying a group mode to collaborative activities such as Forum, Database, Glossary or Wiki.
- Toggle Edit mode on.
- Create a collaborative activity (Forum, Database, Glossary or Wiki) if you haven't already.
- Click the group icon next to the activity
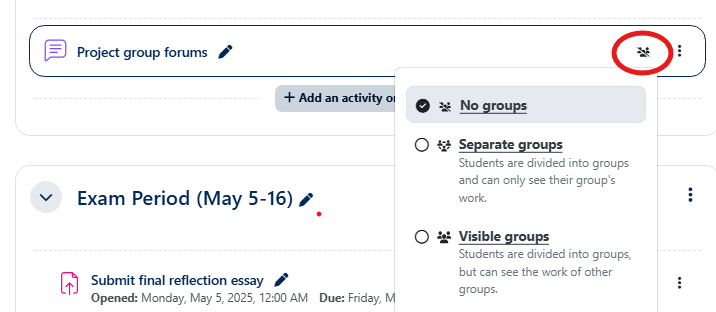
- Select the appropriate option:
- No groups (default). All participants view and contribute to the same forum, database, glossary or wiki.
- Separate groups. Each group has its own forum, database, glossary or wiki and members can only see what is posted there.
- Visible groups. Each group has its own forum, database, glossary or wiki; all participants can view them, but can only post to their own group's space.
Note: Changing the Group mode for a Forum, Database, Glossary or Wiki activity does not affect grading settings for that activity. These activities must be graded individually; to apply a group grade, give all students in a group the same grade.
Create a group Assignment
When group submission is turned on for an Assignment activity, only one group member needs to submit for the entire group and the grade and feedback on the submission is applied to all group members.
- Click on the Assignment to open it.
- Click Settings.
- Click Group submission settings to expand it.
- Change Students submit in groups? to yes.
- Click Save and return to course.
Videos & Further Reading on Groups
Questions?
If you have any additional questions or problems, don't hesitate to reach out to the Help Desk!
Phone: 610-526-7440 | Library and Help Desk hours
Email: help@brynmawr.edu | Service catalog
Location: Canaday Library 1st floor


