Use Zoom's new Scheduler tool to enable other people to schedule online or in-person meetings with you or groups you belong to. You set up and share links to an appointment booking page that shows time slots when you are available for different types of meetings. When someone schedules an appointment, Zoom sends an email or calendar invite (with a Zoom link if needed) to the people involved and reminders or follow-up emails or texts (if desired). By default all messages contain links for rescheduling or cancelling the meeting.
See also: Welcome to Zoom Scheduler video mini-course (14 min; requires SSO login).
Before you start, yo need:
Connect Scheduler to your Outlook calendar
Note: All members of a team must do this before you can create a team booking schedule.
- Go to the Zoom web portal or open the Zoom desktop app and log in with SSO and your college credentials.
- Click Scheduler.
- Click Get Started.
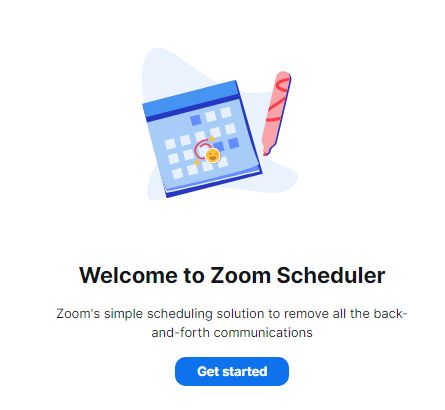
- Edit the the link for your public appointment booking page (must be unique and unused) if needed, then click Next.
- Click Sign in with Microsoft.
- Type in your college e-mail address and click Next.
- Log in with your College password and Duo if prompted.
Scheduler is now connected to your Outlook calendar.
Reauthorizing your account
Zoom may send you an Unable to access your calendar" email asking you to reauthorize the connection to your Outlook calendar if updates or changes to security settings on either platform disrupt it. This is normal, but see Zoom's Reauthorizing Zoom Scheduler to maintain calendar connectivity for tips on verifying the email comes from Zoom and alternative log in options.
Manage your availability
Zoom will also check your connected calendar and excludes time slots that are marked "busy" or "out-of-office."
Set your availability in Scheduler
Your Availability settings delineate the time windows in which Zoom should offer appointments. At a minimum, you should edit your account-level Availability settings to match your normal working hours (Zoom defaults to 9am-5pm, M-F). If your availability varies for different types of meetings (online vs. in-person or in a particular location), you can create multiple availability templates and apply them to different booking schedules.
- On your Scheduler main page, click Settings.
- Click Availability.
- Choose an availability template from the drop-down menu (the default is starred) or click +Create Availability.
- Configure the days of the week and the times of day when you are typically available.
- Use the Active on drop-down menu to choose which Booking Schedules to apply this template to.
- Click Back to Scheduler when you are finished.
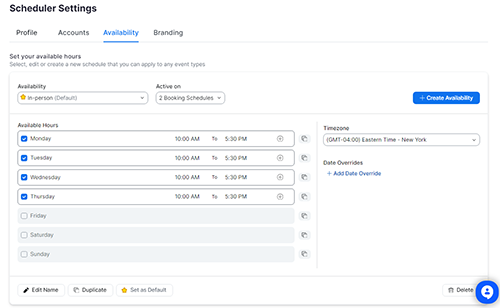
See also Managing the Zoom Scheduler Availability tab.
Keep your connected calendar up-to-date
Block off the dates and time when you are busy or out-of-office in your Outlook calendar to prevent appointments from being scheduled at those times.
- Each Outlook calendar event has an availability setting: Free, Working elsewhere, Tentative, Busy or Out of office.
- You set this when editing the event as shown below or replying to an invitation ("Yes" adds an event to your calendar with the setting the organizer gave it; "Maybe" changes the setting to Tentative).
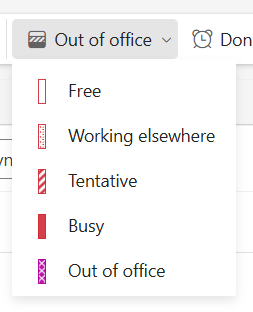 Zoom Scheduler hides booking slots that conflict with events marked "Busy" or "Out of office."
 - It ignores events marked "Free," "Working Elsewhere" or "Tentative."
- See Microsoft's Outlook guide for the most up-to-date instructions for creating and managing calendar events.
- For a more conceptual overview, see LinkedIn Learning's "Time management with Outlook Calendar" videos (requires SSO login).
Create Booking Schedules
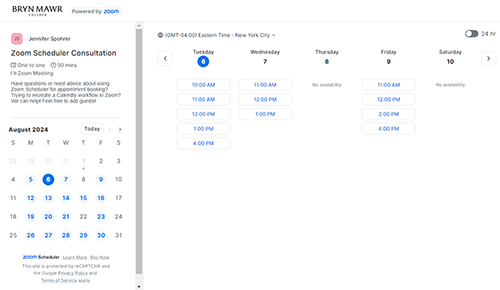
A booking schedule is a page you can share with people to allow them to book a certain type of appointment with either an individual or one or more members of a team. If your appointments are the same length and in the same place, you might need only one booking page. If you want to offer appointments of different lengths (30 mins, 1 hour, etc.), in different locations (office, lab, online, etc.) or a specified purpose, you will need multiple booking pages.
- Go to the Zoom web portal or open the Zoom desktop app and log in with SSO and your college credentials.
- Click Scheduler.
- Click the New booking page button, then choose Create a booking page.
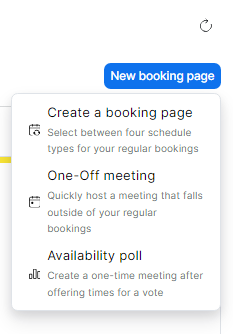
- Choose a booking page option and click Next:
- Enter a Schedule Name and configure the Duration and Location settings, then click Next. You can let your invitees choose from multiple meeting locations by adding options under Location. For example, you might allow invitees to choose between a Zoom meeting or an in-person meeting. Select the "i" icon next to a setting to learn more about it.
- Navigate through the rest of the booking page setup to configure your Availability, Notifications, and other settings as needed, then click Finish to make your booking page live. You can then copy the link to your booking page to share it or view the booking page to confirm that the bookable time slots are set up correctly.
Customize reminders and follow-up notifications (optional)
When someone makes an appointment with you, Zoom immediately sends you and them a calendar invite and confirmation email. You can turn on additional reminders and follow-up messages when setting up a booking schedule. Change format (email/SMS), recipients (you/attendee) and the messages in these from your main Scheduler page.
- Log into the Zoom web portal.
- Click Scheduler.
- Click Notification settings.
- Choose a notification type (such as "Reminder Email & SMS") or click +Create custom notification.
- Use the form to set details about the timing and whether notification is sent by email and/or SMS message, and whether it is sent to you, the attendee, or both.
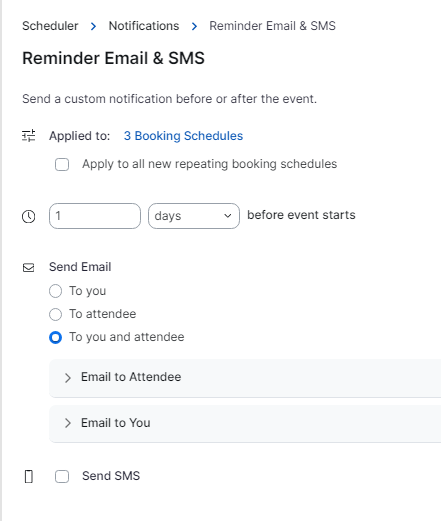
- Click the buttons below your selected Email or SMS options to customize the message text.
- Click Save.
See also Managing and customizing Zoom Scheduler email notifications.
Test, activate, and share booking schedules
How to troubleshoot, activate and de-activate and share booking schedules with people who need to book appointments.
- To check how well booking schedule works, click its (More Actions) icon and choose Troubleshoot. If appointment slots aren't offered at the times you want, check the booking schedule settings and your availability settings.
- To activate or deactivate a booking schedule, click its (More Actions) icon and toggle the Active switch on or off. Only active schedules will accept bookings.
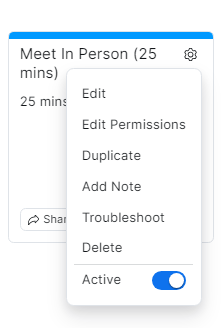
- To share your booking schedules with people who need to book appointments:
- For an individual booking schedule/appointment type, click its Share button, then copy the links and paste them into an email or on a web page. You can also copy the QR codes and paste them in documents that will be printed.
- If you have multiple appointment types, click to copy your Public page link and share it with others to enable them to choose from among those types. Note that your Public page only displays One to One and One to Many booking options where you are the host. Team-level booking pages (Any Host Available or All Host Available) can be displayed on an individual's public page.
Keep in mind that anyone who receives these links or sees a QR code will be able to use it to make an appointment.
View scheduled appointments
When an appointment is booked, Scheduler automatically a meeting invite to your connected calendar, making that time unavailable for other bookings. You can view, reschedule, cancel and join booked meetings using links in these calendar events or from within Scheduler.
- Log into the Zoom web portal or desktop app.
- Click Scheduler.
- Click Scheduled events.
- Click Upcoming, Pending or Previous subtabs to see a list of those bookings.
- Click Export to export booking data in a format you can open in Excel.
Appointment booking for groups
Create and share booking schedules that allow people to make appointments with members of a group.
Zoom offers two team booking types:
- Any Host Available. Use to allow people to make a one-on-one appointment when any member of a group is available. (If multiple group members are free for the slot chosen, Zoom selects one based on your distribution settings.) See Creating an Any Host Available (rotating host) booking schedule for details and instructions.
- All Hosts Available. Use to allow people to make a group appointment with all members of a group. Zoom shows only the slots when everyone in the group is free and sends a meeting calendar invite or email to everyone when it is booked. See Creating an All Hosts Available booking schedule.
To share your group booking schedules:
- If you have only one group booking schedule, click the Share button to get links and QR codes that you can share with other people to enable them to book that type of appointment.
- If you have multiple group bookings and need a page that shows all of them, email help@brynmawr.edu to request a team booking page. (If you aren't certain, or want help with team bookings, we're happy to consult!) Note that Team booking pages can only include Any Hosts Available and All Hosts Available meeting types; individual meeting types (One to One and One to Many) cannot be displayed on a Team booking page.
Questions?
If you have any additional questions or problems, don't hesitate to reach out to the Help Desk!
Phone: 610-526-7440 | Library and Help Desk hours
Email: help@brynmawr.edu | Service catalog
Location: Canaday Library 1st floor


 Zoom Scheduler hides booking slots that conflict with events marked "Busy" or "Out of office."


