Course Listings Page
Bryn Mawr course listings are automated from Bionic. This data feeds the Bryn Mawr website, Undergraduate Course Catalog, and the Tri-Co Course Guide.
Please send corrections or updates to Bryn Mawr course listings to registrar@brynmawr.edu.
Course Editor Role
Some users have a special role called Course Editor that gives them the ability to create and edit course and program description pages within their group. If you do not have the Course Editor role, please reach out to Communications communications@brynmawr.edu to update your course pages and/or get appropriate training to become a Course Editor yourself.
NOTE: Though the typical practice is that Communications will create the course and program description pages, the course editor role does allow you to create those pages yourself. Always consult with Communications communications@brynmawr.edu before creating a new Course page
Creating Course Pages
Go to your Group Management screen for the department in which you need to add a Course page and select Course from the “Add Content to..” right sidebar. In this example, we are in the Biology department’s Group Management screen.

This will take you to the Create Course screen.
Generally, you would only need to use this for a new course, which is not a frequent task.
The Courses content type has two tabs at the top One that shows the Content. This tab is for optional additions to the Course listing.

And one that shows the Course Code information. This tab contains required content, as you can see by the red asterisk.

You will see that there are certain optional and required fields in both tabs.
To make a plain Course page, you would fill in the Title field and the Code Type and Code field in the Course Code tab. This will give enough information for the data feed to pull in the appropriate content.
To add more content, like links, images or supplemental text, you can use the following:
- Pre-Content (in the Content tab),
- Description (in the Course Code tab),
- Additional Text (in the Course Code tab)
- Post-Content (in the Content tab)
- You can also choose to add a Social Media Callout for the Department, if applicable (in the Content tab).
All these fields are described below in the Editing a Course Page section.
To add a Course Code to a Course page, you would need to select a Course Type from the dropdown in the Course Code tab.

If you choose Subject you will see these choices pop in.

you would then select a Subject Code. You can add additional Subject Codes if your Courses page needs to list a few, as is the case with Greek Latin Classics

If you choose Concentration you will see these choices pop in.

Or the Conc Code (Concentration)
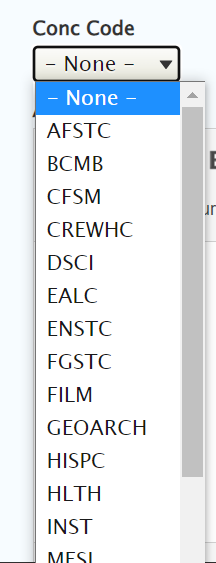
To pull in the relevant data for the Subject or Concentration.
You can add multiple courses this way by selecting the Add another item button (highlighted by the red box in the screenshot below) and selecting the code for another course to be displayed. You can drag-n-drop the order of the subjects to display on the page by using the crosshair-handle on the left.
In this example of the Course edit screen, we see the Code Type as Subject with three courses by subject being pulled in

Once you are satisfied with your course content, you can press save.
Editing Course Pages
When logged in, you can visit the Group Nodes page and sort by Type to find the Courses page

Once you select the Type, press the “Apply” button to sort for that type of content.
You should see only one result in the table

If you have Course Editor permissions, you should be able to see the Edit Node option in the Operations column.
Press Edit Node to get to the edit screen.
Alternatively, you can navigate to the Courses page of your department and press the Edit tab at the bottom of the page. The Edit tab will only appear if you have permissions to edit it.

Adding Custom Text to Your Course Page
Pre-Content
Use the Pre-Content WYSIWYG for adding text and images to the top of the page. Pre-Content text displays above the boilerplate text that is present on all course pages. This will be a great place to add things that pertain to all courses offered (especially if more than one Course Code is displayed).

Here is the Pre-Content text highlighted with the red box, as displayed on the page:

Description Field
Use the Description field in the Code section of the content entry form to add text to the top of the Course Code, below the boilerplate text present on all course pages as well as any Pre-Content text.

Here is the page with the Pre-Content and the Description filled in (both highlighted by the red boxes):

As you can see these are two places where you could add custom text, links, button-links, images, etc. toward the top of the page to better curate your course information.
Since the Biology Courses page would like a photo on top, we will add it here in the Description wysiwyg.
Add an image
When you click on the Image icon in the WYSIWYG toolbar you will see a pop-up window appear that is defaulted to the Browse Library tab
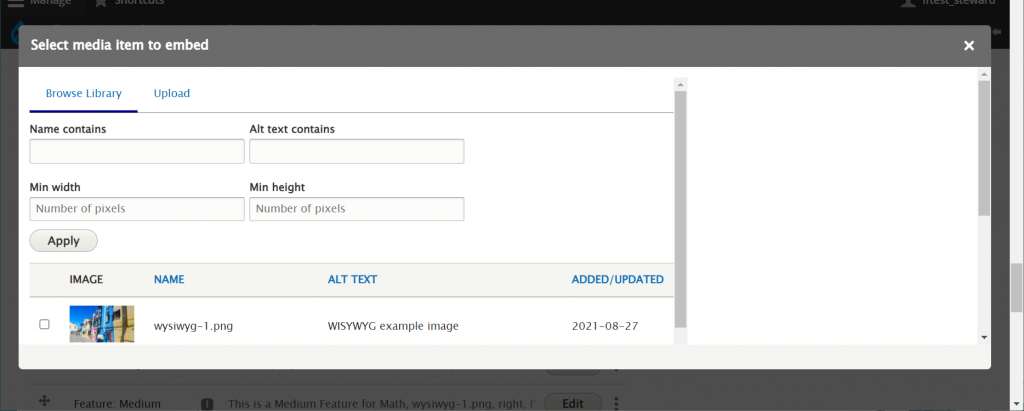
To add an image, click on the Upload tab for uploading a new image or Browse Library tab for an already uploaded image. Please refer to our Adding Images tech doc for detailed instructions.
Here is what it looks like once the page has been saved

Additional Text
Within the Code section, there is an Additional Text field that you can use to add custom text, links, button-links, images, etc. toward the bottom of the page. One example of Additional Text is manually listing Haverford or Swarthmore course schedules and descriptions. For this example, use the table button available in the Additional Text field to create a table for your schedule. Please refer to our Tables in Drupal tech doc for detailed instructions on adding tables in a WYSIWYG.

The Additional Text displays after the Course Schedules and before the Course Descriptions, as seen here highlighted with the red box

Just past the Additional Text field is a place to add another Course Code, if you are displaying multiple Courses or Concentrations (like the Classics where they display Greek, Latin, etc.)

For our example, we've added the NEUR Subject Code. Let's see where it will display on the page.
Here you can see the green box indicates where the Biology Course Schedule ends (with Biology's Additional Text displaying after the Biology Course Schedule) and the red box indicates where the Neuroscience Course Schedule starts (with Neuroscience's Description Text displaying before the Neuroscience Course Schedule) on the page.

Post-Content
The Post-Content field, located just past the Add Course button, is where you are encouraged to add things that you used to display in the sidebar on the old site. In our example for Math, there was a bit of custom text that would be perfect for the end of the page.

Social Media Callout
The last item in the Course content entry form is the Social Callout Flexible Content Item. This is a great place to link to the department’s social media feeds.

Once you are satisfied with your changes, you can press save.
We can see that the Post-Content text and the Social Media Callout both display at the very end of the Course Descriptions, right above the footer of the page.

If after reading this article or watching the training videos you still have questions, we can help! Sign-up for any of our Drupal Drop-ins throughout the year. Schedule a Drupal training session for you or your whole department with our Drupal Trainer. If you have any additional questions or problems, don't hesitate to reach out to the Help Desk! Phone: 610-526-7440 | Library and Help Desk hoursStill need Drupal help? Have more Drupal questions?
Questions?
Email: help@brynmawr.edu | Service catalog
Location: Canaday Library 1st floor
