Within Moodle, you can hide entire courses or parts of courses. The latter includes sections, subsections, activities and resources. Hiding will prevent Registered students, Auditors and guests from seeing them.
Before you start, you need:
- an Instructor of record, Other editing teacher role or Non-teaching editor role in a Bryn Mawr Moodle course
Hide/show entire course
Hiding a course makes it invisible to students and unenrolled viewers. Course participants with teaching or editing roles can still see and enter the course, but the course title will appear grayed out in category listings.
Warning: Hiding an academic course during registration can mislead students: when it disappears from their Moodle Dashboards, they may think they've been dropped! If classes have started, please leave the course visible and hide sections instead.
- Log into Moodle and open the course you wish to hide.
- Choose Settings.
- Set Course Visibility to Hide (invisible to students, even if enrolled) or Show (visible).
- Click Save and Display.
Hide/show course elements
Manually
Manually hide course sections, subsections, activities or resources that you don't wish students and guests to see (teaching and editing roles will still see them, just marked as Hidden from students).
To hide an item:
- Toggle Edit mode on.
- Click (Edit) next to a visible item.
- Select Hide in the item settings.
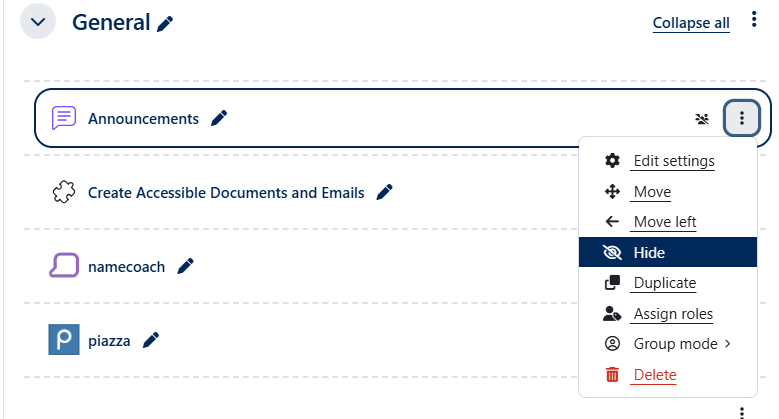
- Moodle adds a Hidden from students tag to remind teachers that an item is invisible; students cannot see this tag.

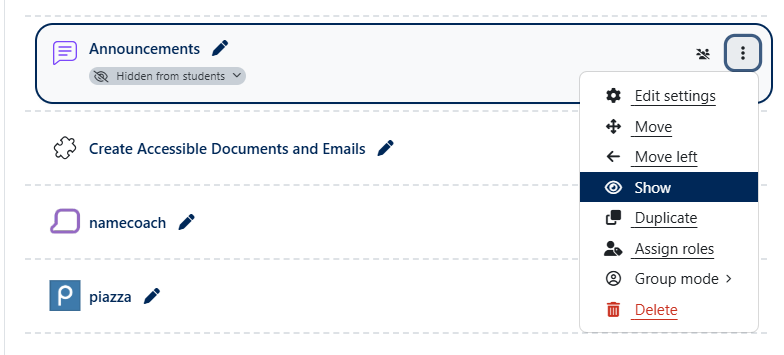
To unhide an item:
- Toggle Edit mode on (if needed).
- Click (Edit) next to an invisible item.
- Select Show in the item settings.
Automatically, at a specified time
Add date restrictions to hide or reveal a course section, subsection, activity or resource to students and guests at a future date and time (teaching and editing roles will still see them, just marked as Hidden from students).
- Toggle Edit mode on.
- Click (Edit) next to a visible item.
- Choose Edit settings.
- Click Restrict access to expand it.
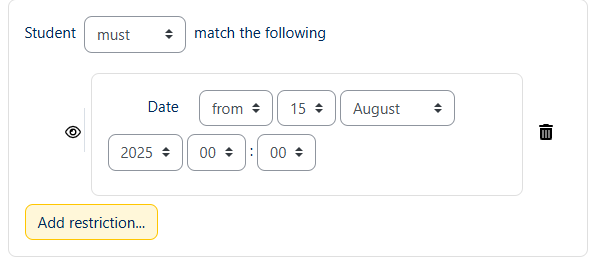
- Click Add restriction.
- Click Date.

- Leave the first phrase set to “Student must match the following” and use the drop-down menus to below it to configure your parameters, for example:
- To unhide an item on a specified date, leave the default (Displayed if student doesn't meet this condition) setting, and enter the date and time from which you want it to be visible. In the example depicted below, the item would become visible on August 4, 2023, at midnight.
- To hide an item on a specified date, leave the default (Displayed if student doesn't meet this condition) setting, change from to until, then enter the date and time at which you want the item to stop being visible.
- To set a window of time that an item is visible, configure the first restriction to set the date and time when the item becomes visible, then click Add Restriction to add a second that sets the date and time when visibility ends.
- Click Save to finalize your Setting changes.
Videos & further reading on courses and course sections
Questions?
If you have any additional questions or problems, don't hesitate to reach out to the Help Desk!
Phone: 610-526-7440 | Library and Help Desk hours
Email: help@brynmawr.edu | Service catalog
Location: Canaday Library 1st floor


