This article reviews the steps to create accessible slides in Microsoft PowerPoint. For more information, see Microsoft’s documentation on making PowerPoint presentations accessible.
Before you start, you may need access to the following:
- the Microsoft PowerPoint application installed on your laptop or desktop
Choose an accessible theme
Microsoft’s accessible templates use accessible color settings, contrast, and fonts and have been designed so that screen readers can more easily read the slide content
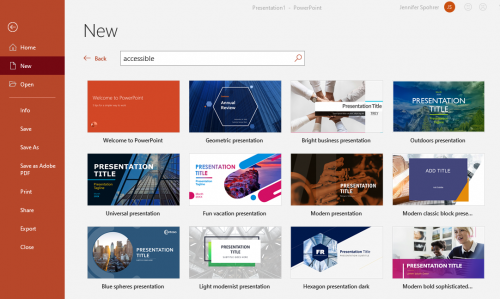
- Click File, then New.
- In the Search for online templates and themes box, type the word “accessible” and press Enter.
- Select your template from the results.
Use built-in slide layouts
The content placeholders in these built-in layouts contain invisible “tags” or labels such as “Title 1”, “Subtitle 2,” etc. that assistive technologies can use to contextualize content for readers.
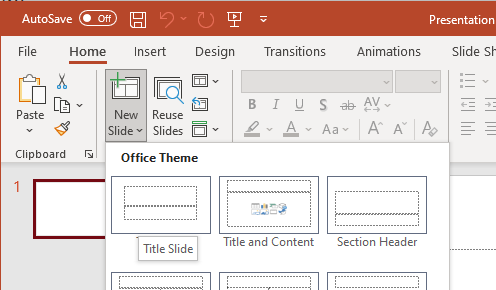
- Click New Slide.
- Choose an appropriate slide layout from the drop-down menu (e.g., Title Slide, Title and Content, etc.).
- Add the appropriate content to each placeholder container.
If you need to reorganize content on a slide:
- Apply a different built-in slide layout (see Microsoft’s “What is a Slide Layout”) OR
- Modify the “slide master” for the pre-built layout (see Microsoft’s What is a Slide Master?”)
Use unique slide titles
- Use a unique, descriptive title for each slide. Individuals who use assistive technologies use slide titles to identify and locate slides.
- If information is spread across multiple slides, add sequence markers to keep titles unique, e.g. Agenda (1 of 2), Agenda (2 of 2).
Use meaningful hyperlink text
Make sure any URLs you add to the document are working hyperlinks with unique “display text” labels that describe the link’s destination. This “display text” is read by screen readers.
To insert descriptive hyperlinks:
- Type the text you want to make a link.
- Select that text, then right-click (or control-click) on your selection and choose Link.
- The text you selected will be in the Text to Display box; this will appear (and be read) as the link to click on.
- Enter the URL that the link should point to in the Address box.
- If it is difficult to briefly describe a link’s destination, you can optionally click ScreenTip and to add information that will pop-up or be read when the cursor hovers over a link.
- Click OK.
Use tables wisely
Some information may be easier for viewers to scan or understand if it is organized in rows and columns. To ensure your tables are accessible for individuals using assistive technologies:
- Tag the first row of each column as column headers:
- Position your cursor inside the table
- Click Table Design and check Header Row under Table Style Options
- Adjust the header row format settings manually as needed
- Keep tables simple. Avoid complex tables with merged or split cells.
- Avoid blank cells. Use the appropriate null value (0, n/a, etc.) instead.
Note: Don't use tables for layout — that is, to align and group slide elements. Use PowerPoints tools for aligning and arranging objects instead.
Add alt text to images and charts
Alt text (alternative text) describes important images and visual elements on a slide for readers who cannot see them.
- Open the Alt Text panel
- Select an image, chart or other visual element and choose Alt Text on from its Format ribbon (e.g., Picture Format, Chart Format, etc.)
- Add a short description or check the Mark as decorative if a screen reader or other assistive technology can ignore the image.
- Select another image or close the pane.
OR
- Open the Alt Text panel
- Right-click (control-click) on the visual element and choose Edit Alt Text … from the contextual menu.
- Add a short description or check the Mark as decorative if a screen reader or other assistive technology can ignore the image.
- Select another image or close the pane.

Tips:
- Only describe images or visual elements that convey important information.
- Don’t repeat information about the image that is already presented in the surrounding text.
- Be concise.
Use the Accessibility Checker
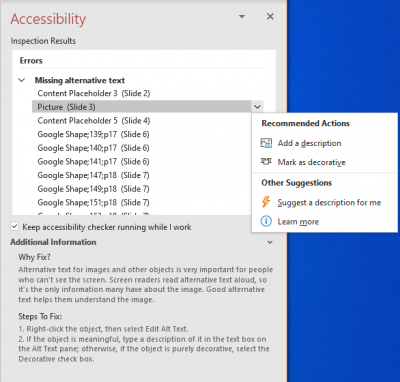
- Click Review in the top menu bar and choose Check Accessibility. Microsoft will display the results in the Accessibility pane on the right side of the screen.
- Click on each Error, Warning or Tip to see:
- A list of all objects with this issue in your document.
- More information about the issue and how to fix it.
- Click one of the objects in the list; PowerPoint will jump to the slide where it appears and highlight it.
- The text beneath the list explains how to fix the issue; in many cases, you can click the down arrow at the end item label in the list for shortcuts to the Recommended Actions.
Questions?
If you have any additional questions or problems, don't hesitate to reach out to the Help Desk!
Phone: 610-526-7440 | Library and Help Desk hours
Email: help@brynmawr.edu | Service catalog
Location: Canaday Library 1st floor
