Panopto: Sharing recordings
Last Modified on 08/13/2025 5:56 pm EDT
By default, recordings "inherit" or have the same Share settings as the folder in which they are stored. For example, recordings you add to your My folder are only visible to and editable by you. You can adjust Share settings at the recording or folder level to enable other people to edit or view them within Panopto and get share links to include in emails or web pages.
Before you begin, you may need:
Share with specific people
Check who can see or edit a Panopto recording and give specific people access. This is the only way to give someone Creator permissions, enabling them to edit the recording(s). Giving someone access to a folder automatically gives them the same access to the recordings within that folder.
- Log into Panopto.
- Navigate to the recording or folder you wish to share and click (Share).
- For folders, click the folder to open it; (Share) will be in the top menu bar.
- For recordings, hover your cursor over the recording until the menu pops up.
- If you don't see a share icon, you don't have permission to share the recording or folder; ask the person who created it to give you Creator permission. (Note that your My Folder can't be shared.)
- The People and groups section shows you whether permissions were inherited and a list of people who currently have access.
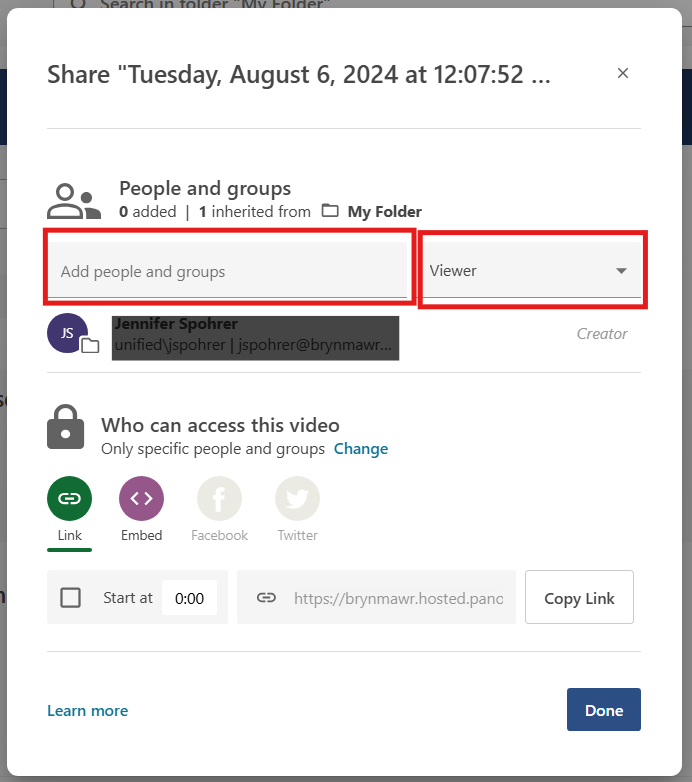
- To add someone, begin typing their name into the Add people and groups box, wait for list of options to appear, and select one.
- Choose a permission level from the drop-down menu:
- Viewer -- watch the recording(s) from their Panopto Shared with me page or a link you share.
- Viewer with link -- only watch the recording(s) if you send them a link; it does not show up on their Shared with me page.
- Creator -- watch or edit the recording(s) from their Shared with me page or a link you share.
Note: To give someone Creator access to a recording in your My Folder, you must move it to a subfolder created within your My Folder.
- Repeat steps 4-5 to add multiple people with the same permission level.
- Toggle Send email to notify people on, type in a Message and click Send if desired (optional). Check Include table of contents and transcript if available if you want to add them to this email (this does not affect their visibility on Panopto).
- Click Done.
Warning: In some cases, you will be able to check Inherit members and permissions from (name of parent folder) setting to give a recording or video identical access to the folder it is inside. Do not check this option for a Panopto folder associated with a Moodle course. Doing so may cause participants to lose access to recordings!
Get a share link
You can also enable people to view a video using a "share link" that you paste into an email, an instant message, or a web page. The Who can access this folder setting determines how that share link works: you can limit it to specific people or get a link that works more broadly.
- Log into Panopto.
- Navigate to the recording or folder you wish to share and click (Share).
- For folders, click the folder to open it; (Share) will be in the top menu bar.
- For recordings, hover your cursor over the recording until the menu pops up.
- If you don't see a share icon, you don't have permission to share the recording or folder; ask the person who created it to give you Creator permission. (Note that your My Folder can't be shared.)
- Check the Who can access this folder setting, and click Change if you need a different level:
- Restricted: Get a link that only works for the people listed under People and groups. (They will need to log in to Panopto to access the recording.)
- Your Organization (unlisted): Get a link that current Bryn Mawr faculty, staff and students (including Haverford students) can use to log into Panopto and view the recording(s). It won't show up on their Shared with me pages or when they search Panopto.
- Your Organization: Get a link that current Bryn Mawr faculty, staff and students (including Haverford students) can use to log into Panopto to view the recording(s) AND add the recordings to their Shared with me pages and search results.
- Public (unlisted): Anyone can click the link and view the recording(s); no login is required.
- Public: Anyone who has the link can view without logging in; recordings may be discoverable outside of Panopto.
- Click Copy link.
- Paste the link into an email or instant message or add it to a web page to share it.
Videos & Further Reading on Sharing Recordings
Questions?
If you have any additional questions or problems, don't hesitate to reach out to the Help Desk!
Phone: 610-526-7440 | Library and Help Desk hours
Email: help@brynmawr.edu | Service catalog
Location: Canaday Library 1st floor

