Following the guidelines below helps ensure that all recipients will be able to read e-mails you send. For information on features that can make it easier for you to read and write e-mail when using Outlook, please see Accessibility Features in Outlook.
For more detailed information, see Microsoft's documentation for making email accessible.
Add alt text to images
Alt text (or alternative text) provides a concise description of an image for screen reader users. The alt text will also appear in place of an image when the image cannot be loaded or rendered properly.
Windows () and Outlook Online
In an email draft, click an image in the message body.
- To display the formatting toolbar, click Show Formatting Options.
- In the toolbar, click Add alternate text or image.
- Type a description for the image and click OK.
macOS ()
- In an email draft, click an image in the message body.
- In the menu bar at the top of the screen click Format.
- From the Format menu, click Edit Alt Text…
- Type a description for the image and close the Alt text menu.
Mobile devices ()
- In an email draft, double tap an image. This opens the context menu.
- Tap Alt Text.
- Type a description for the image and press OK or SAVE.
Add meaningful hyperlinks
Make sure the hyperlinked text or a ScreenTip provides meaningful, descriptive information about where the link leads. This helps assistive technology users scan the email for links and identify the one they need.
Windows ()
Select the text to which you are adding the hyperlink, and right-click it.
- Click Link. This opens a dialog box, with the selected text is now in the Text to Display field.
- In the Address field, type the destination URL.
- Click ScreenTip and in the ScreenTip field, add descriptive text.
- Click OK
macOS ()
- Select the text to which you are adding the hyperlink, and right-click (or press Control and click) it.
- Click Hyperlink. This opens a dialog box, with the selected text is now in the Text to Display field
- In the Address field, type the destination URL.
- Click ScreenTip and in the ScreenTip field, add descriptive text.
- Click OK
Android ()
- Select the text to which you are adding the hyperlink. This opens the context menu.
- Tap Add Link.
- In the Link field, type the destination URL.
- Tap SAVE.
iOS ()
- Select the text to which you are adding the hyperlink and tap it. This opens the context menu.
- Tap Add Link. You may need to tap to expand the context menu.
- In the Link field, type the destination URL.
- Tap the checkmark.
Use accessible font formatting
- Color should not the only means of conveying information. People who are colorblind may not be able to distinguish text in different colors. Add other formatting (such as bold or italics) when using color to call out or distinguish text instead of relying only on color.
- There is sufficient contrast between text and background colors. For greatest accessibility, use the default font color setting — Automatic, as this will work best when recipients are using high contrast or dark viewing modes to read email. If you do customize the color, check that the contrast between the text and the background meets Web Content Accessibility Guidelines (WCAG) 2.0.
- Use sans serif fonts that are at least 11pt or larger. Sans serif fonts and larger font sizes are easier for people with dyslexia or low vision to read.
Avoid animated GIFs
Blinking or flashing content can trigger seizures for individuals with photosensitive seizure disorders. Animated GIFs can be accessible if the animation is no longer than five seconds and only plays once or if viewers manually start and stop it. They are most problematic when the animation loops continuously. If you cannot guarantee an animation won’t loop, it is safest to leave it out or replace it with a still image.
Use the Accessibility Checker
Microsoft’s Accessibility Checker can check your email drafts for certain issues that could cause access problems and suggest ways to fix them. See Microsoft’s Accessibility Checker documentation for details about what it does and doesn’t check, troubleshooting information, and advice on interpreting results and fixing issues.
Note: The Accessibility Checker is not available in Office apps for iOS () or Android () devices.
To check an email before sending it:
Outlook online (Office 365)
- Click (More options) in menu bar above the email.
- Choose Check for accessibility issues.
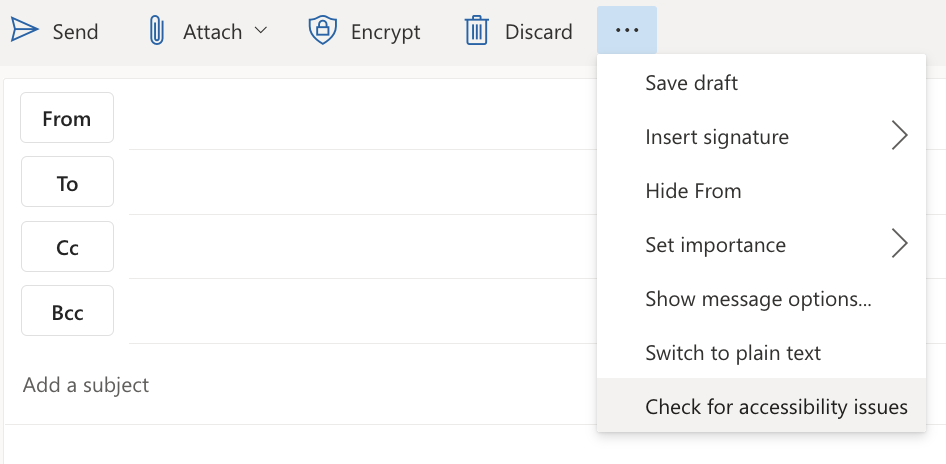
- Results will appear in an Accessibility pane to the right of your draft. If issues are found, click Fix This to access the settings you need to fix them.
Outlook for macOS ()
- Click the Options ribbon, then Check Accessibility.
- Results will appear in a pane to the right of your draft. If issues are found, click Fix This for more information and to access the settings you need to fix them.
Outlook for Windows ()
- Click Check Accessibility in the Message or Review ribbon.
- Results will appear in a pane to the right of your draft. If issues are found, click Fix This for more information and to access the settings you need to fix them.
Accessibility Checker — Windows () only
To run the Accessibility Checker while you write and display warnings as MailTips:
- Click File.
- Select Options in the bottom of the right sidebar.
- Click Ease of Access.
- Change the Accessibility checker options to:
- Show me accessibility warnings while I work — the Accessibility Checker always runs.
- Show me accessibility options when — the Accessibility Checker runs only when the conditions you select are met.
Note: In Outlook for Mac, the Accessibility Checker always runs in the background if you are drafting an email to one or more recipients who prefers accessible content.
Questions?
If you have any additional questions or problems, don't hesitate to reach out to the Help Desk!
Phone: 610-526-7440 | Library and Help Desk hours
Email: help@brynmawr.edu | Service catalog
Location: Canaday Library 1st floor

